Installing Rope and Flexible LED Strip Lights on Your Deck or Dock
Could you at any point introduce ROPE LIGHTING on your DECK and additionally DOCK? Indeed – For a really long time we’ve had rope lights on our dock that started with enhancing the dock region during special times of year. They’re not difficult to introduce, genuinely reasonable and puts out a perfect proportion of relaxed, backhanded, surrounding lighting.
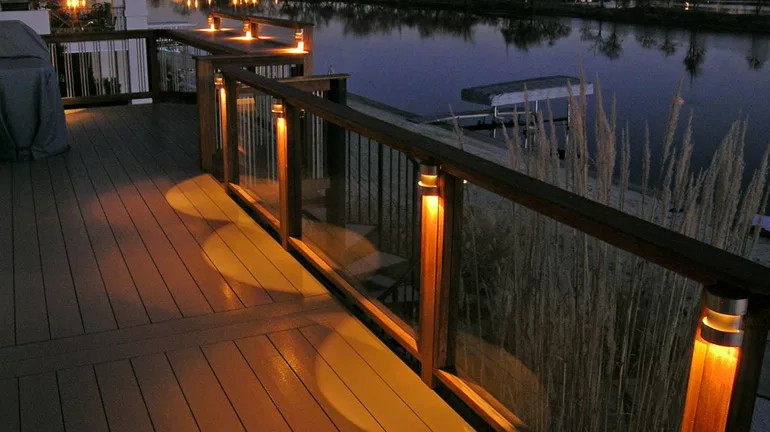
For the individuals who need to have rope lighting as a more long-lasting type of highlight lighting, there are rope lights built for this reason. WATERPROOF Adaptable Drove STRIP LIGHTS are explicitly made for the outside.
Waterproof Adaptable Strip Drove lights offer the ideal answer for making energy-proficient, sharp emphasize and mind-set lighting. Strip lights are prudent, adaptable, and can be sliced to accommodate your region, and since they rimless downlight areas of strength for a, they can be mounted basically anyplace. Accessible in different varieties you can make embellishments on essentially any surface, marine, auto as well as home.
Moves toward Introduce Rope Lights: The easiest and most normal technique to introduce rope lighting is to nail it on a superficial level utilizing link cuts. You really want link cuts, a sledge, a power source and the rope lighting. The time required for establishment relies upon the length of the rope.
1. Choose where to introduce the rope lights – Pick where you need to introduce the rope lighting. Much of the time, the rope lighting is introduced on the roof, the rooftop brackets or on the floor decking to create the ideal outcomes. Consider the place of the wellspring of ability to guarantee that your rope arrives at the attachment.
2. Mount the rope lighting – Utilize the mallet to cut the lighting on a superficial level. Slide the rope in the open circular segments of the link cuts during the establishment as you turn it in your ideal example. Guarantee that the sledge doesn’t miss the objective while raising a ruckus around town since it can obliterate the rope lighting.
3. Test their result Switch off the attachment, and fitting the rope lighting in. Utilize the additional string in the event that the length of the rope lighting doesn’t arrive at the electrical plug. Switch the attachment on to check whether it lights.
Fast responses to the most well-known questions
• Do I really want a regulator for my strip lights? A regulator is discretionary however adds the capacity to turn your lights on and off and control different highlights, for example, diminishing.
• Could I at any point associate different strips? Strips can be associated start to finish up to different meters, contingent upon your item.
Moves toward Introduce Adaptable Drove Strip Lighting with Solderless Connectors:
1. Materials Required – Have every one of your materials prepared. You will require scissors, Drove adaptable strip lights, a connector, ruler (if necessary), and a bunch of hands.
2. Estimating the number of feet of Driven strip you that need – You might have your Driven strip light shipped off you in a roll (16 feet) or by the foot, contingent upon the amount requested. Conclude how much adaptable Drove strip lighting you will require for your venture. Since the Drove strip must be cut each third Driven, you might need to go somewhat finished or under your ideal particular.
3. Instructions to cut the Drove strip – As you can see underneath, the adaptable strip light must be cut along the assigned lines. Take a sharp sets of scissors and cut along the line.
4. Focus on sure and negative markings – Significant: Notice the positive and negative sides of the Drove strip light. This is significant for the following couple of steps. Some of the time when you cut the Drove strip light, things can get blended around.
5. Prologue to the connector – Every connector has different sides. To protect you have the right side up, ensure the more extensive of the white sides faces up. This is the top. BE Delicate and haul the locking gadget out away from the wires. Try not to pull on the wires to do as such, as the connector is delicate.
6. Appending the connector to the Drove strip – Significant: Variety doesn’t make any difference all of the time! Ensure you follow the positive side of the flex strip down through the connector wire to the power supply. Red/dark can either mean (+) or (- ) contingent upon what side you have snared the connector to.
7. Tying down the plate to the Drove light – In the model underneath, if we somehow managed to join the connector to the opposite side of the adaptable strip light, the red would be negative and the dark positive. Then, Tenderly secure the securing plate back, interfacing the terminals of the Drove adaptable strip light to the connector. Be delicate and ensure the mounting plate is safely shut, or the lights won’t work.
8. Interfacing the Drove strip to drive – You are currently prepared to plug your Drove Adaptable strip light to the Drove power supply. Coordinate the positive and negative markings with the positive and negative wires from the power supply. Ensure the power is off when you do this.
On the off chance that your strip lights don’t illuminate:
1. Wire tone doesn’t make any difference all of the time! Ensure you follow the positive side of the flex strip down through the connector wire to the power supply. Red/dark can either mean (+) or (- ) contingent upon what side of the Drove flex strip you have snared the connector to.
2. Another normal issue is that the connector might be introduced topsy turvy; rehash ventures above and attempt.
3. Likewise, Ensure the plate is shut as far as possible. Be delicate!
4. Check your power supply and ensure it is attached appropriately, with right (+) and (- ) also.
5. What number of feet of Driven strip would you say you are utilizing versus how enormous your power unit is? Assuming that you are utilizing 1 reel of 24 v Ultra brilliant with e 2.5 amp power unit, it won’t work in light of the fact that the power unit is excessively little.