
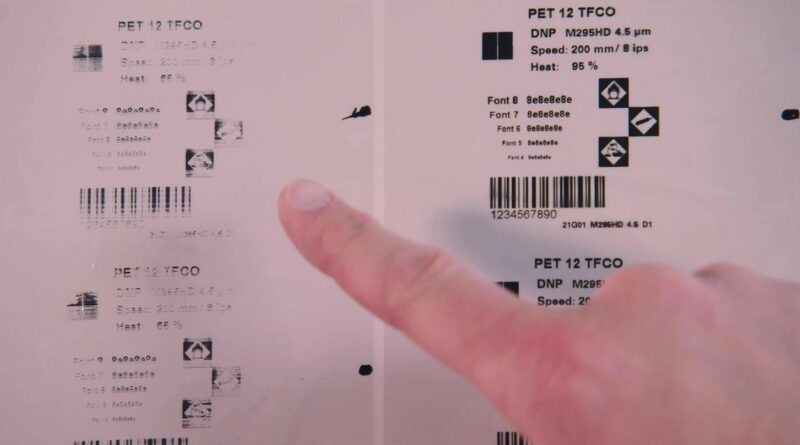
How to Fix Faded or Poor-Quality Prints From a Thermal Label Printer
Faded text, uneven darkness, missing sections, and unclear barcodes can make otherwise useful labels difficult to read. Poor print quality does not always mean the printer needs replacement. Simple problems with the media, settings, or printhead of thermal label printer often cause the issue.
A thermal label printer depends on the correct combination of printhead condition, label material, printing settings, and, for thermal transfer models, ribbon quality. Checking these areas in a logical order can help identify the source of poor output.
Check the Label Material First
Start by confirming that the labels match your printing method. Direct thermal printers require heat-sensitive media, while thermal transfer printers need compatible labels and ribbons.
Using unsuitable or poor-quality media can produce weak, inconsistent, or unclear images even when the printer itself works correctly.
Also check the label roll for moisture, damage, contamination, or improper storage. Media that has degraded may not produce consistent results.
Clean the Printhead
A dirty printhead remains one of the common causes of faded or uneven printing. Dust, adhesive residue, and other debris can prevent parts of the printhead from making proper contact with the label.
Turn off the printer and allow the printhead to cool before cleaning it. Use the cleaning method recommended by the manufacturer rather than abrasive materials or unsuitable chemicals.
Clean the printhead regularly, especially when the printer operates frequently or handles adhesive-backed labels.
Check the Printhead for Damage
If cleaning does not solve the problem, inspect the printhead for signs of damage.
A damaged heating element can create a consistent blank line or faded section that appears in the same position on every label.
Avoid touching the heating surface with your fingers. Oils and residue can affect print quality and potentially damage the component.
Increase Print Darkness
Print darkness, sometimes called density, controls how much heat the printer applies during printing.
If the output looks too light, increasing the darkness setting slightly may improve the result. Make small adjustments rather than immediately selecting the highest available setting.
Excessive darkness can increase heat exposure and may contribute to unnecessary printhead wear, so use the lowest setting that produces clear results.
Check the Printing Speed
Printing speed can affect output quality. A very fast setting may not produce the same results as a slower setting, particularly with detailed graphics or barcodes.
Try reducing the speed and printing another test label. If the output becomes noticeably darker or sharper, the previous speed may not suit your media or design.
The ideal combination of speed and darkness depends on the printer, media, and application.
Inspect the Thermal Transfer Ribbon
If you use a thermal transfer printer, check the ribbon before changing other settings.
Make sure the ribbon:
- Matches the label material
- Has the correct printable side facing the label
- Sits correctly in the printer
- Has no wrinkles or tears
- Has enough usable material remaining
A poorly installed or incompatible ribbon can cause faded areas, streaks, and inconsistent printing.
Check Ribbon and Label Compatibility
Thermal transfer printing works through a combination of ribbon and label material. A ribbon that performs well on one type of media may not produce the same results on another.
Wax, wax-resin, and resin ribbons have different characteristics. Choose the ribbon according to the label surface and the durability requirements of the application.
When changing label material, check whether you also need to change the ribbon.
Look at the Print Resolution
A printer’s resolution affects how much detail it can reproduce. Small text, fine lines, and detailed barcodes may require higher resolution than basic labels.
However, higher resolution does not automatically fix every quality problem. If the printhead, media, or settings cause the issue, changing resolution may not help.
Choose a resolution appropriate for the size and detail of your labels.
Check Label Alignment and Calibration
Poor calibration can create output that looks incorrectly positioned or partially missing.
The printer needs to detect where each label begins and ends. If the media sensor does not identify the gaps or marks correctly, the printer may start printing in the wrong location.
Run the manufacturer’s calibration procedure after changing media or when label positioning becomes inconsistent.
Inspect the Rollers
The platen roller and other media-handling components help move labels through the printer.
Dust, adhesive buildup, or wear can cause uneven movement. This may result in inconsistent positioning or areas where the label does not remain properly aligned with the printhead.
Clean accessible rollers according to the manufacturer’s instructions. If a roller appears damaged or excessively worn, replacement may be necessary.
Check Your Label Design
Sometimes the printer works correctly, but the label file creates poor output.
Look for very small text, thin lines, oversized graphics, or barcode dimensions that do not suit the printer’s resolution.
Simplifying the design can improve readability and reduce unnecessary processing. Make sure images and barcodes use appropriate dimensions for the intended print resolution.
Test With a Simple Label
Create a basic test label containing only a few lines of text and a simple barcode.
If the test label prints clearly, the problem may come from the original label design, software, or print settings.
If the simple label still looks faded or uneven, focus on the printhead, media, ribbon, printer settings, and mechanical components.
Check the Printer Driver and Settings
Incorrect driver settings can affect print quality. Check that the selected printer model, media type, resolution, speed, and darkness settings match your actual setup.
Software may also override settings configured directly on the printer.
After making changes, print a small test batch instead of immediately printing hundreds of labels.
When Should You Replace the Printhead?
A printhead does not last indefinitely. Continuous use, excessive heat, unsuitable media, and poor maintenance can shorten its service life.
If cleaning, media replacement, ribbon changes, and setting adjustments do not resolve a persistent defect, the printhead may have worn or damaged heating elements.
Follow the manufacturer’s replacement guidance or contact a qualified technician when internal repair is required.
Preventing Poor Print Quality
Regular maintenance can help reduce recurring print problems. Keep the printhead and media path clean, use compatible supplies, and avoid unnecessarily high darkness settings.
Store labels and ribbons under the conditions recommended by their manufacturers. Replace damaged media rather than trying to use a compromised roll.
It also helps to test new labels and ribbons before placing a large order. Small compatibility issues become much more expensive when they affect an entire supply.
Final Thoughts
Faded or poor-quality thermal prints often result from a dirty printhead, unsuitable media, incorrect darkness or speed settings, ribbon problems, or worn components. Checking these areas systematically can help identify the cause without unnecessary repairs.
Start with the simplest solutions, such as cleaning the printer and checking the media. If the same defect appears consistently after basic troubleshooting, inspect the printhead and other components or seek professional service.
